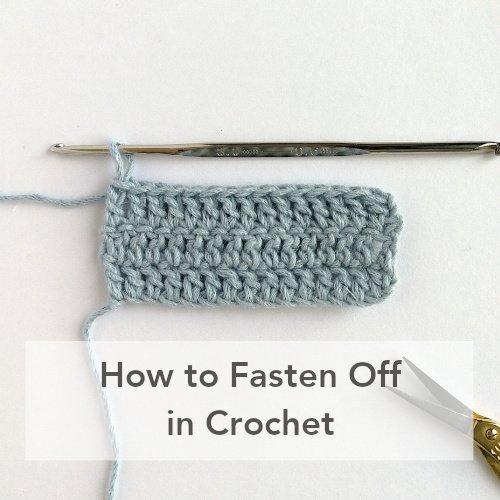
How to Count Crochet Rows with Confidence
Learning how to count crochet rows is really important for any project. Whether you're making a small item or a larger project like something to wear.
Making sure you have crocheted the correct number of rows means you know with confidence that you are following the instructions for the correct row, that your crocheted item is going to turn out as expected and that if you make a mistake you are more likely to be able to figure out where you went wrong.
By the end of this article you will have mastered how to identify and count your rows correctly. Let’s get to it!
How to Count Crochet Rows
Differentiating Rows
The tricky part of how to count crochet rows is being able to differentiate between each one but it’s the most fundamental step to counting with confidence.
If you can figure out which row is which, where one ends and one begins vertically, then you will have no problem counting them up super quick.
Due to the fact that we turn at the end of each row, alternating rows look different. One shows as the front of the crochet stitch and the other as the back of the stitch and so it can sometimes be hard to see which is one row and which is another.
To help out, I've created a small sample of crochet in each of the basic crochet stitches below using alternating colours to show the difference between the two (front and back) and how they appear.
Rows in Single Crochet (UK Double)
First up is the single crochet or the UK double. This is the most difficult to differentiate because the stitches are small and easily blend into one another.
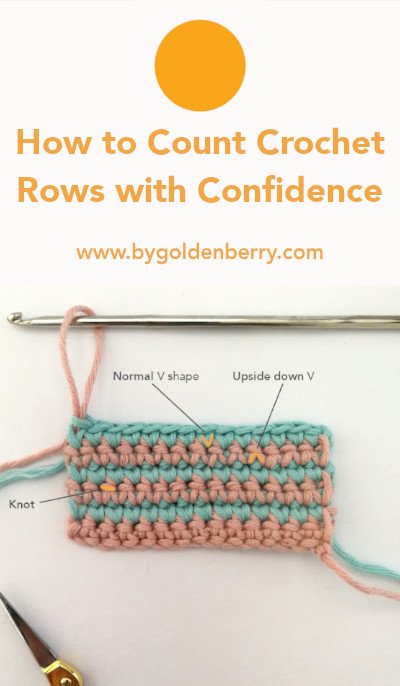
On the wrong side of the stitch (back), which is shown in pink and on odd rows, you can see the knot of the stitch and an upside down V shape.
On the right side (front), shown in teal and on even rows, there is a normal shaped V pattern. See the photo below.
Thus, there are two ways to count these up. You can either count the normal V shape as one row and the upside down V as another row. Or count the knot as one row and then make sure to count a row in between the knots too.
Rows in Half Double Crochet (UK Half Treble)
Rows in half double crochet or the UK half treble are slightly taller than the single crochet and so they’re a bit easier to differentiate. Having said that, there is not a clear V shape that is normal on one row and upside down on the next like in the single crochet stitch so we need to use something else as a marker.
On the wrong side, the rows made in pink and on odd numbered rows, a twist in the stitch is visible, see the highlight and pointer in the photo below.
We can use this twist as our marker and count the twists as one row and the depressed section in between as the next.
Rows in Double Crochet (UK Treble)
When learning how to count crochet rows, as the stitches get longer they become easier to distinguish.
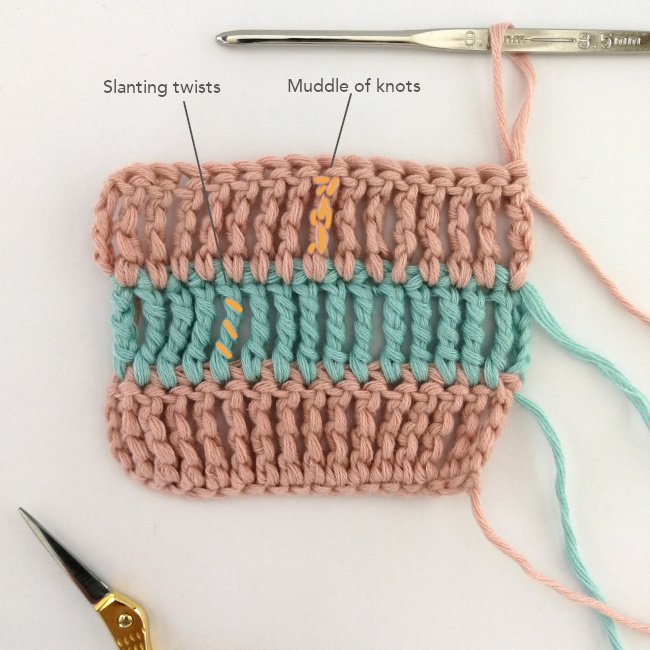
The double crochet stitch or the UK treble is again slightly taller than the half double crochet and so it is easier to pick out the recognisable slanting twists and knots at the top of each stitch followed by a straight section of yarn.
On the right side of the stitch (the front), the rows shown in teal and on even rows, one slanting twist in the top of the stitch is visible. On the wrong side (the back) a knot can be seen instead.
They are both followed by a straight section of yarn underneath. See the photo below for clarity.
Using these slanting twists and knots it is easy to count up all the rows really quickly. A slanting twist represents one row and a knot, the next :)
Rows in Treble Crochet (UK Double Treble)
Even taller again are the treble crochet stitches or the UK double. More length on the stitch shows more twist and turns and so finding the front and the back of stitches is becoming even easier still.
You may notice a pattern here. The treble crochet stitch, being slightly longer, shows two slanting twists on the right side (the front) of the stitch. The back still shows a knot but the knot is simply more complex than the double crochet stitch.
Rows in Double Treble (UK Triple Treble)
Following the same pattern, the double treble crochet stitch (UK triple treble) is the longest of the basic crochet stitches. The easiest rows of stitches to count up, however, I have included it here to show the continuation of the pattern and to make this tutorial complete.
The right side of the double treble stitch, the ones shown here teal and on the second row only, there are three slanting twists. Again, on the wrong side, those shown in pink and on the first and third row, show a muddle of knots.
Other Ways to Count Rows in Crochet
If distinguishing each row by the shape of the stitches isn’t helpful for you then don’t fret! There are other ways you can keep track of your rows too.
Use a Row Counter
Another great way to keep track of your stitches is to use a row counter. Every time you work a row, add it to your row count number. This is my favourite row counter as it’s made from stainless steel, so it will last forever, and it comes in black making it really sleek and professional or rainbow coloured for a bit of fun.
Use Stitch Markers
If you don’t have a row counter and don’t want to invest in one just yet, you could also use stitch markers. If you have plenty to hand, simply mark the end of each row so that you can quickly count them up whenever you need.
Or, if you only have a few, you could add a marker on every 5th, 10th, 20th etc row so that you know each marker means a batch of rows. Also easily countable.
You don’t need to buy any fancy markers if you don’t have any. You may have noticed in my tutorials and videos, I use paper clips all the time to mark my stitches and rows or you could simply use another coloured piece of yarn :)
Use a Ruler
Another way to count rows is to measure your stitches and use the measurement as a guide to where your stitches begin and end.
Let’s say your treble crochet stitch measures 1cm high, you can then measure your project and find how many cms it measures in total and divide it by the height of your stitches. So if your project measures 10cm and your stitch height is 1cm then you can guess that you have made 10 rows.
However, this method needs a disclaimer. Even if your stitch height in the first row is 1cm, your tension could change during your rows making your workings out inaccurate. You would need to measure your gauge all the time and be sure that you are working your stitches in the same way for each row for it to be accurate.
As always, get in touch if you have questions or pop them in the comments below, I’m always happy to help. Happy counting!

