How to Count Crochet Stitches and Chains
Counting crochet stitches can get so confusing at times. It took me a while to get the hang of it at the beginning and there seems to be contradictory information everywhere about which is the correct way to count.
So I’ve created an easy and complete guide on how to count crochet stitches and chains for you to keep as a reference.
Don’t have time now? Save this for later
Do we Really Need to Count our Stitches?
Before we get into how to count our stitches, the quick answer to the question above is YES! Always count your stitches.
Counting stitches in crochet is super important. It allows us to make sure that our crochet work is correct and that it is ok to move to the next step.
If at any point our count doesn’t match that of the designers then our finished item will not look like how we expect or how the designer has shown it to be. If you’re crocheting a wearable item then this is even more important; the wrong count could mean that your item won’t fit properly.
Believe me, it’s a horrible feeling to spend so much time working on your new project and get close to the end only to realise too late that your count was off and you’ll need to frog it back, or even worse, start again!
So let’s get started!
How to Count Crochet Stitches Properly
Let’s start with a few basics.
Does the Loop on the Hook Count?
No. You never count the loop that is currently on your hook. This is not a stitch and as such doesn’t get counted into the final stitch count.
Does the Turning Chain Count?
You will find articles that say that for some stitches it does and for some it doesn’t. Confusing! Why is this? Let’s be honest, no one really knows why.
One thing is for sure though; when the turning chain is counted as a stitch, it leaves gaps in your work which most of the time we don’t want.
If the gap is wanted in the pattern then I’m sure it will be mentioned by the designer that the turning chain is counted as a stitch and to make your next stitch in the second to last stitch from the previous row.
Based on the above, I would always assume that the turning chain is NOT counted as a stitch unless otherwise mentioned by the crochet designer.
If you’re unfamiliar with turning chains then check my complete crochet turning chain guide for more info and a handy chart.
Now that we have some basics out of the way, let’s get into how to count stitches in three main ways; 1] In Chains 2] In Rows and 3] In Rounds. They are all very similar but it's best to keep them separate for clarity.
How to Count Chains
Counting a foundation chain is one of the first things we do at the beginning of a project. The first set of instructions in a pattern usually call for a specific number of chains to begin with and it’s the first count that we need to get right.
If you’re not sure about how to make a foundation chain yet head to my article on how to crochet a foundation chain which includes a easy and quick video tutorial.
How do we know if we’re counting our chains correctly? We can identify each chain by the V shape shown in the photo below.
Each V is a chain and we start counting from the very bottom of the chain, just after the slip knot and keep counting until we reach the loop on the hook. Remember! Don’t count the loop on your hook.
That’s it! Easy :)
How to Count Stitches in Rows
Here is a small example of single crochet stitches worked in rows. To identify a stitch, again, we look for the V shape along the top of our work.
Finding our stitches in rows is even easier than when counting chains because our work at this point has more body and sturdiness making the Vs more visible. See the photo below.
As you can see, the stitches are much clearer than in the foundation chain and they have a clear front loop (the loop that faces you) and the back loop (the loop furthest away from you).
No matter which crochet stitch you are working with you will always have this V shape on the top to identify the stitch.
You will start counting from the end of your work to the beginning (where your hook is), for me the end of my work is on the right hand side. It will be your left if you are left handed.
Start counting the V shapes along the top until you reach the loop attached to your hook. Again, we don’t count the loop on the hook.
How to Count Stitches in Rounds
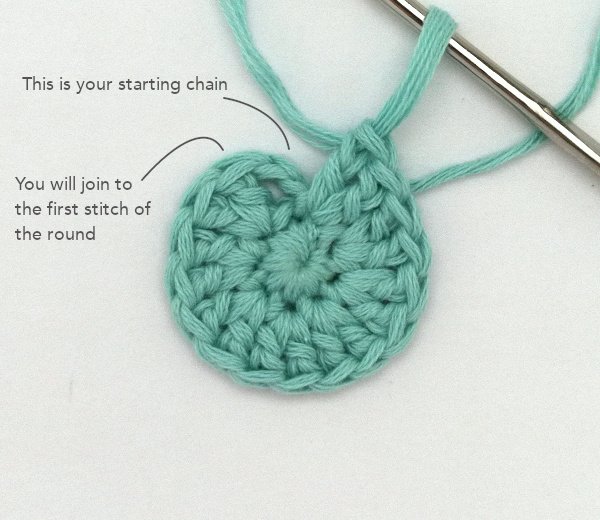
Counting stitches in rounds is very similar to counting in rows however sometimes it can be confusing where the round ends and where it begins.
At the end of each round, unless you are working in a spiral, you will need to join the end of the round to the beginning to make a complete circle.
Based on the same principles as when working in rows, I would work with the rule that the turning or starting chain does not count as a stitch unless otherwise mentioned in the pattern.
And so when joining the two ends, you will miss the starting chain and make a slip stitch into the first stitch of the round and this join will count as a stitch.
To make things even easier, you can use stitch markers to keep track of the first and last stitch of each round and then count from the first marker to the second.
What if my Count is Wrong? How do I fix it?
Unfortunately the only way to fix an incorrect stitch count is to go back to where it was correct. Yes, this means undoing your hard work, however there are two options.
You can try and find the error before undoing anything so that you know how far back you need to frog or undo one row at a time.
Finding the Error
Did you miss a stitch or add an extra one in somewhere along the way? Start by checking your rows.
Do they look the same? Are there any obvious discrepancies? Can you see any stitches that look odd or different to the rest when they shouldn’t be? Once you find something, you can just undo your work back to that point and hopefully it’s not too far back.
The other way to do it is to undo one row at a time and count your rows again after each undone row until you find where you went wrong.
I really hope you found this tutorial helpful. If you have questions don’t hesitate to get in touch or pop them in the comments section, I’m always happy to help.


